 |
| November 19, 2024 | Volume 20 Issue 44 |
Designfax weekly eMagazine
Archives
Partners
Manufacturing Center
Product Spotlight
Modern Applications News
Metalworking Ideas For
Today's Job Shops
Tooling and Production
Strategies for large
metalworking plants
Engineer's Toolbox: Critical inspection of airplane parts with a SVS-Vistek 10GigE camera
Manufacturers of aviation engine components are being impacted by Industry 4.0's emphasis on quality control, because Industry 4.0 is challenging them to rethink outdated processes and to embrace new technologies.

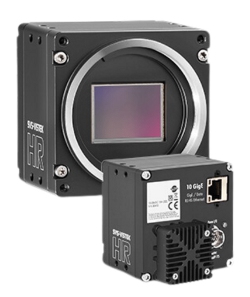
The SVS-Vistek hr455CXGE 10GigE color camera features a 61-megapixel sensor with 9566 x 6380 resolution, rolling shutter, 3.76-µm pixel size, and an 18-fps frame rate. [Credit: Image courtesy of SVS-Vistek]
The small size and odd shapes of airplane engine components make them difficult to inspect. Typically, they must undergo time-consuming manual inspection by trained QC operators. However, this cumbersome process is prone to human error and inefficiencies, and it has resulted in defects going undetected.
To assist in introducing Industry 4.0 concepts to component producers, a research team at the Polytechnic University of Turin (Italy) engineered an automated inspection system for commonly used honeycomb engine parts. Their two-phase, non-destructive testing process is fully controlled by a Kuka self-mounted robot leveraging a 61-megapixel 10GigE camera from SVS-Vistek, coupled with artificial intelligence (AI) algorithms for the detection of different types of defects. SVS-Vistek is headquartered in Germany and provides CCD and CMOS camera solutions all over the world, including to clients in the United States.
Shortcomings of manual inspection
Honeycombs are critical to regulating engine compression. The name "honeycomb" comes from their structure, which consists of several hexagonal cells joined to one another. Honeycombs are excellent at regulating the flow of air or gases (i.e., exhaust) in engines, turbines, and combustion chambers. The gases are uniformly distributed as they travel through the cells, resulting in better fuel efficiency and the reduction of engine turbulence. Probably the most well-known honeycomb is in automotive catalytic converters that feature honeycomb structures coated with compounds like platinum that the exhaust emissions react to.
OEMs can manufacture honeycomb parts in virtually any shape or size, as well as using different cell geometries depending on the customer. Materials must be heat resistant, high in mechanical strength, and as lightweight as possible. Depending on the application and material, honeycomb cells are subjected to intense heat phenomena during manufacture when they are attached to a support by a hot metal fluid, which may result in a variety of defects. Manual inspection is required to detect these defects, both externally and internally.
Unfortunately, manual inspection can lead to errors due to subjective analysis, human tendencies, the working environment, and characteristics of the specific part. Therefore, the successful detection of defects is highly influenced by the ability and experience of the human operator.
Benefits of automated inspection
The Polytechnic University of Turin researchers sought to develop a completely new approach that would automate the inspection of the honeycomb parts, making the process more objective and less prone to human errors. This system was developed within the context of the EIT Manufacturing AVISPA-2, a project focusing on automating visual inspection and processes for aerospace engines.

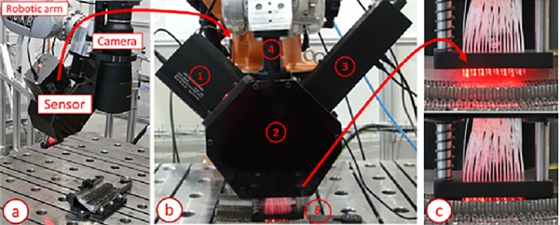
Inspection system setup: a) Robotic arm with SVS-Vistek camera and b) optical fiber sensor prototype with c) glass fiber system. [Credit: Image courtesy of Polytechnic University of Turin/SVS-Vistek]
The system was built using the following components:
- Kuka KR16-2 robot with KRC4 robot controller;
- Ingesys IC3 controller to activate the camera and glass fiber sensor;
- SVS-Vistek hr455CXGE 61-megapixel 10GigE Vision color camera and K|Lens 3D lens to acquire images. The multi-view stereo system allows the extraction of 3D information, while the 10GigE camera delivers up to 1.1 GB/s of image data with distances up to 100 m;
- Optical fiber sensor composed of 24 glass fibers and a microcontroller for data processing. This sensor goes inside the cells where the glass fibers are lit up in order to inspect neighboring cells;
- Disparity map software to provide depth information about each honeycomb cell; and
- Artificial intelligence used to detect defects by means of automated segmentation techniques.
Two-phase testing process
In the first phase of the testing, a robotic arm moves the SVS-Vistek camera directly above the honeycomb to acquire a frontal image at a resolution of 9568 x 6380 pixels at 18 frames per sec. A multi-view "kaleidoscopic" of the part is then created from nine images cut into individual sub-images, rectified, and used to compute a disparity map for cell depth information. Next, the AI analyzes the images and detects external defects and cell coordinates. If defects are detected, the inspection ends and the part is rejected. Otherwise, phase two starts.

Example of honeycomb cells segmentation (right) and honeycomb defects analysis (left). [Credit: Image courtesy of Polytechnic University of Turin/SVS-Vistek]
The second phase detects internal defects. Here, the robotic arm inserts the glass fiber sensor inside the cells of the honeycomb, scanning the whole part. Next, the AI takes the acquired honeycomb image and disparity map as input and creates a segmentation of the single cell profiles and the coordinates of their centers. The AI then inputs a set of quantitative features extracted from the segmentation results and identifies the faulty regions accordingly. This process is based on a combination of classic approaches -- standard edge detectors, adaptive thresholding techniques -- combined with deep learning architecture. AI analysis identifies superficial defects like damaged cells, missing cells, and opened cells, together with the coordinates of the center of each cell.
System validation
To validate the automated system, the Polytechnic University of Turin researchers performed full demonstrations on multiple honeycomb parts within an aviation plant. The system proved to be fast, accurate, and robust. Unlike manual inspection, the system was completely repeatable, and the obtained results were traceable and documentable in every stage.
All targeted defects, internal and external, that would result in part rejection were identified by the system with a high degree of precision. In addition, total inspection time was in the range of 40 to 60 seconds, which is a very promising result. Future system development will focus on reducing the inspection time by at least 50%.
Do you have a need for a vision inspection system or interested in learning more about this or similar applications? Go to svs-vistek.com. In North America, contact SVS-Vistek at 800-935-6593 or email info-usa@svs-vistek.com.
About SVS-Vistek
SVS-Vistek GmbH was founded in 1987 to sell optoelectronic components. In 1999, the company began designing, developing, and manufacturing its own CCD and CMOS cameras in Gilching, Germany. Today, SVS-Vistek is one of the world's most innovative manufacturers of industrial cameras and has an international presence in this marketplace.
Source: SVS-Vistek
Published November 2024
Rate this article
View our terms of use and privacy policy
